Thanks to one of our 2010 brides, she pointed me to this link.
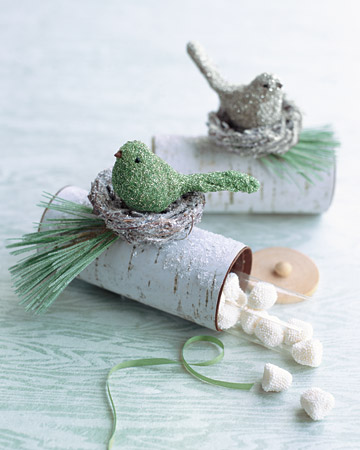
How adorable would these be for favor boxes for your winter wedding?

Tools and Materials
- Clip art
- Toilet paper or paper towel tubes
- Brown paint
- Glue stick
- Craft glue
- Hot-glue gun
- Wooden disks, available at michaels.com
- Wooden knobs, available at michaels.com
- Nests, available at michaels.com
- Pine springs
- Artificial bird
- Glitter, available at artglitter.com
- Candy or other small treats
Step 1Prepare Tube
Use 1 3/4-inch-diameter toilet paper tubes or trimmed paper towel tubes. For each, you'll need two 3/4-inch-wide strips from an extra tube. Glue strips in tube ends 3/16 inch from openings. Paint tube brown. Let dry.
Step 2Decorate Tube
Trim clip art to wrap around tube, leaving 1/16 inch of tube showing at ends. Glue in place with glue stick. Use craft glue to secure a 1 3/4-inch-diameter wooden disk in one end of the tube to close it. Glue a wooden knob to a second disk. Glue a 3/4-inch disk to bottom of tube for balance.
Step 3Add Glitter
Brush craft glue over top of tube; sprinkle with clear shard-glass glitter. Brush glue on a pine sprig; sprinkle with clear fine glitter. Mix white paint with more glue; brush on a grapevine nest, and sprinkle with clear shard-glass glitter. Brush glue on an artificial bird, avoiding beak and eyes; sprinkle with colored glass glitter. Hot-glue bird into nest, and nest and sprig onto tube. Tuck favors inside; close end with other disk.
Read more at Wholeliving.com: Yule Log Favor Boxes - Martha Stewart Crafts


0 comments:
Post a Comment